Configuring Firebase
Firebase is an app development platform that has extremely useful tools such as storage and real-time synchronization. With Firebase alone, a study creator can capture all data from participants and then export that data for further analysis. In what follows, there are two main products we will be using: the Firestore database and Firebase's storage product.
Create a Firebase Project
Navigate to Firebase and go to your console.

Create a new Firebase project


Enabling Gemini or Google Analytics is not necessary. Feel free to disable this when prompted.
Name your project accordingly.

Adding a Firestore Database
With your project created, we are now going to add a Firestore database to it. On the left-hand side, you should see a "Databases & Storage" dropdown menu. From that, select "Firestore".

Click "Create Database" in the center of the screen.

For the next two steps, there is no need to change the defaults. Simply click "Next" and then "Create".


With the new database created, we'll want to change the read/write rules to only allow authenticated users to write to the database. Go to the "Rules" tab (second tab) and copy and paste the following code. Then click "Publish".

rules_version = '2';
service cloud.firestore {
 match /databases/{database}/documents {
    match /{document=**} {
    	allow read: if true;
      allow write: if request.auth != null;
    }
  }
}
Create indexes for participant sequence assignment
Before the first Participant starts, open the Firestore Indexes tab and create these two composite indexes. Use Collection scope and enter sequenceAssignment as the collection ID for both:
| Index | Fields in order |
|---|---|
| Rejected assignments by time | rejected Ascending, timestamp Ascending |
| Reusable assignments by time | claimed Ascending, rejected Ascending, timestamp Ascending |
Wait until both indexes are enabled before opening the study. Add them to existing Firebase deployments when upgrading as well. These indexes are created once per Firebase project/database, not once per study.
If an index is missing, ReVISit blocks study startup. In development mode, its error includes a Firebase link that opens the index creation form with the required fields filled in. Follow that link as the Study Designer who administers the Firebase project, then wait for Firebase to finish building the index. You can also create both indexes in the console ahead of time using the table above.

Adding Firebase Storage
Once that is finished, we will enable standard Firebase storage. Click the "Databases & Storage" dropdown menu again and navigate to "Storage".
As of October 1st, 2024, Firebase has changed its requirements for newly created projects. You will now be prompted to add a payment method when creating a new Firebase project. You will only be charged if you exceed the limits of the "Always Free Tier". We suggest reading over the Firebase tier limits here. We have conducted several studies using reVISit without going over the "Always Free Tier" limits, such as this recent study, but please be proactive and set up billing alerts to ensure you do not exceed the free tier limits.


We can leave the options as their defaults.


Once the storage product is enabled, navigate to the "Rules" tab.
Replace the existing rule with the following code and then publish:
rules_version = '2';

service firebase.storage {
  match /b/{bucket}/o {
    match /{allPaths=**} {
      allow read, write: if true;
    }
  }
}

Adding automatic transcription for Think Aloud studies
If you plan to use Think Aloud studies with Firebase and want transcripts, install the Google Cloud Speech-to-Text extension from the Firebase Extensions marketplace.
Once the extension is configured for your project, it will automatically transcribe uploaded audio files. This is the setup reVISit expects when you want transcripts to appear in analysis and export workflows.
Adding an App to the Firebase Project
We are now going to add an app to your Firebase project:


With the app set up, we are ready to copy over the app configuration to your reVISit project.
In the image below you will see a JSON object denoted as const firebaseConfig = { ... }.

Copy the contents of that JSON object into the .env file for the variable VITE_FIREBASE_CONFIG. In the .env file, your VITE_FIREBASE_CONFIG variable should still be a JSON object that is escaped in single quotes.
Authentication
We are now going to set up the authentication so that your browser is authorized to communicate with your Firebase database.


In addition to what is shown above, you will want to enable "Google Authentication" in the same section of Firebase. You can do this by choosing the "Google" sign in method under the "Additional Providers" section. The anonymous sign-in is used for participants taking the study. It allows them to access and send data to the Firestore without external authentication. The Google sign-in method is used to authenticate administrators for managing studies and data. Please see here for more detailed authentication information and set up instructions.
App Check
App Check verifies that requests to Firebase come from your app. For a new setup, use Fraud Defense, which includes reCAPTCHA Enterprise. Depending on the console, the provider may appear under either name. Firebase Authentication and App Check are separate: keep the sign-in providers configured above.
These instructions require a reVISit version that supports VITE_RECAPTCHA_ENTERPRISE_SITE_KEY. Older versions use the v3 provider. Update reVISit before configuring an Enterprise key; replacing the value of VITE_RECAPTCHAV3TOKEN alone does not switch providers.
Create an Enterprise site key
-
Open Fraud Defense in Google Cloud and select the same project as your Firebase app. Enable the reCAPTCHA Enterprise API if prompted.
-
Select Create key, give it a recognizable display name, and choose Web as the application type.
-
Add the hostnames where your study will run. For GitHub Pages, use
your-github-name.github.io. For a custom domain such ashttps://revisit.dev/study/, userevisit.dev. Enter hostnames withouthttps://, ports, or paths, and keep domain verification enabled.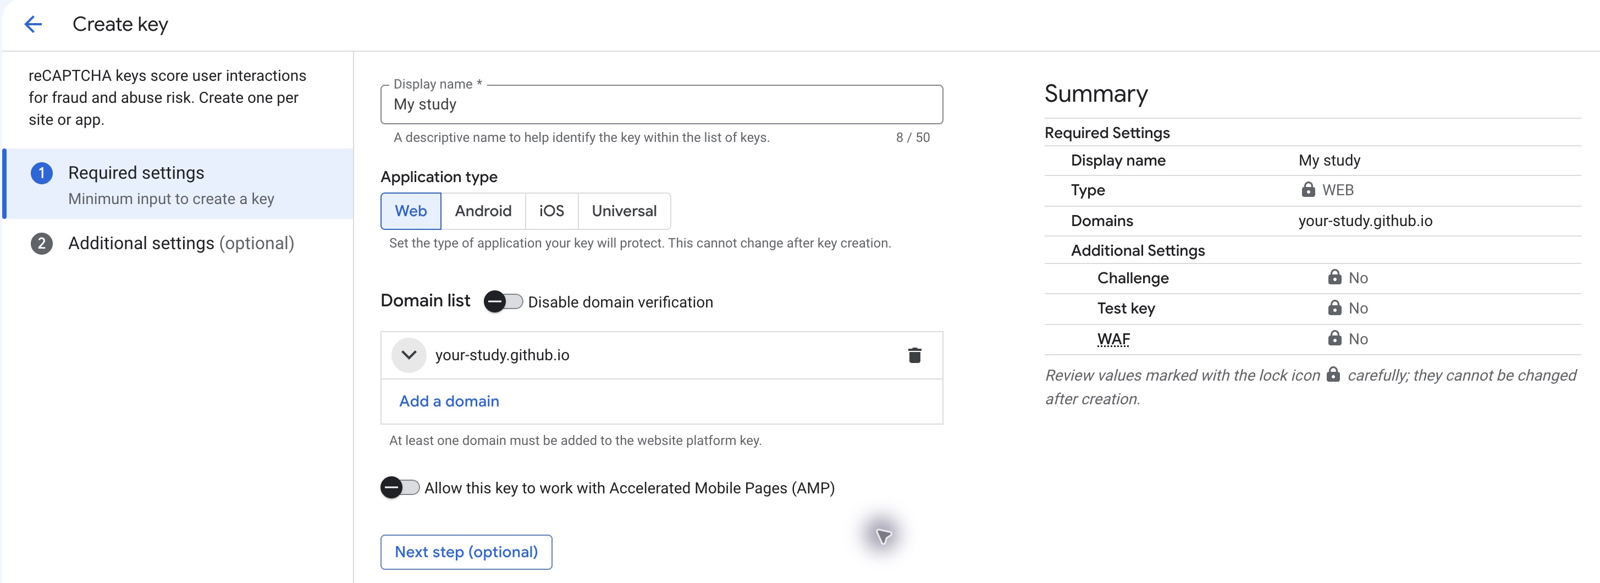
-
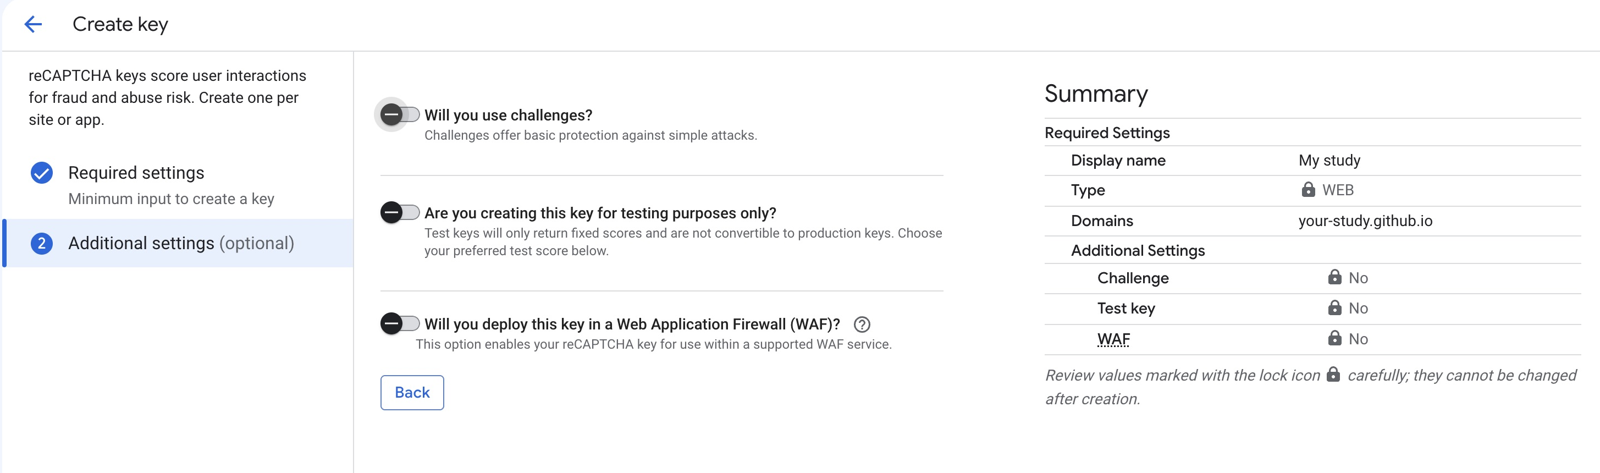
Leave Will you use challenges? disabled to create a score-based key. Leave the test-key and Web Application Firewall options disabled, then create the key.
-
Copy the site key. You will use the same value in Firebase and your reVISit build. The site key is public; this setup does not require a secret key in your application.
The screenshots use example values. Replace them with your own study name and hostname.
Do not add localhost or 127.0.0.1 to the production key. Use the debug-token setup below for local development.
Register the key with your Firebase app
In Firebase Console → Security → App Check → Apps, select the Web app whose app ID matches VITE_FIREBASE_CONFIG. Choose Fraud Defense (formerly known as reCAPTCHA Enterprise), paste the site key, and save. The default one-hour token lifetime and risk threshold of 0.5 are reasonable starting points.
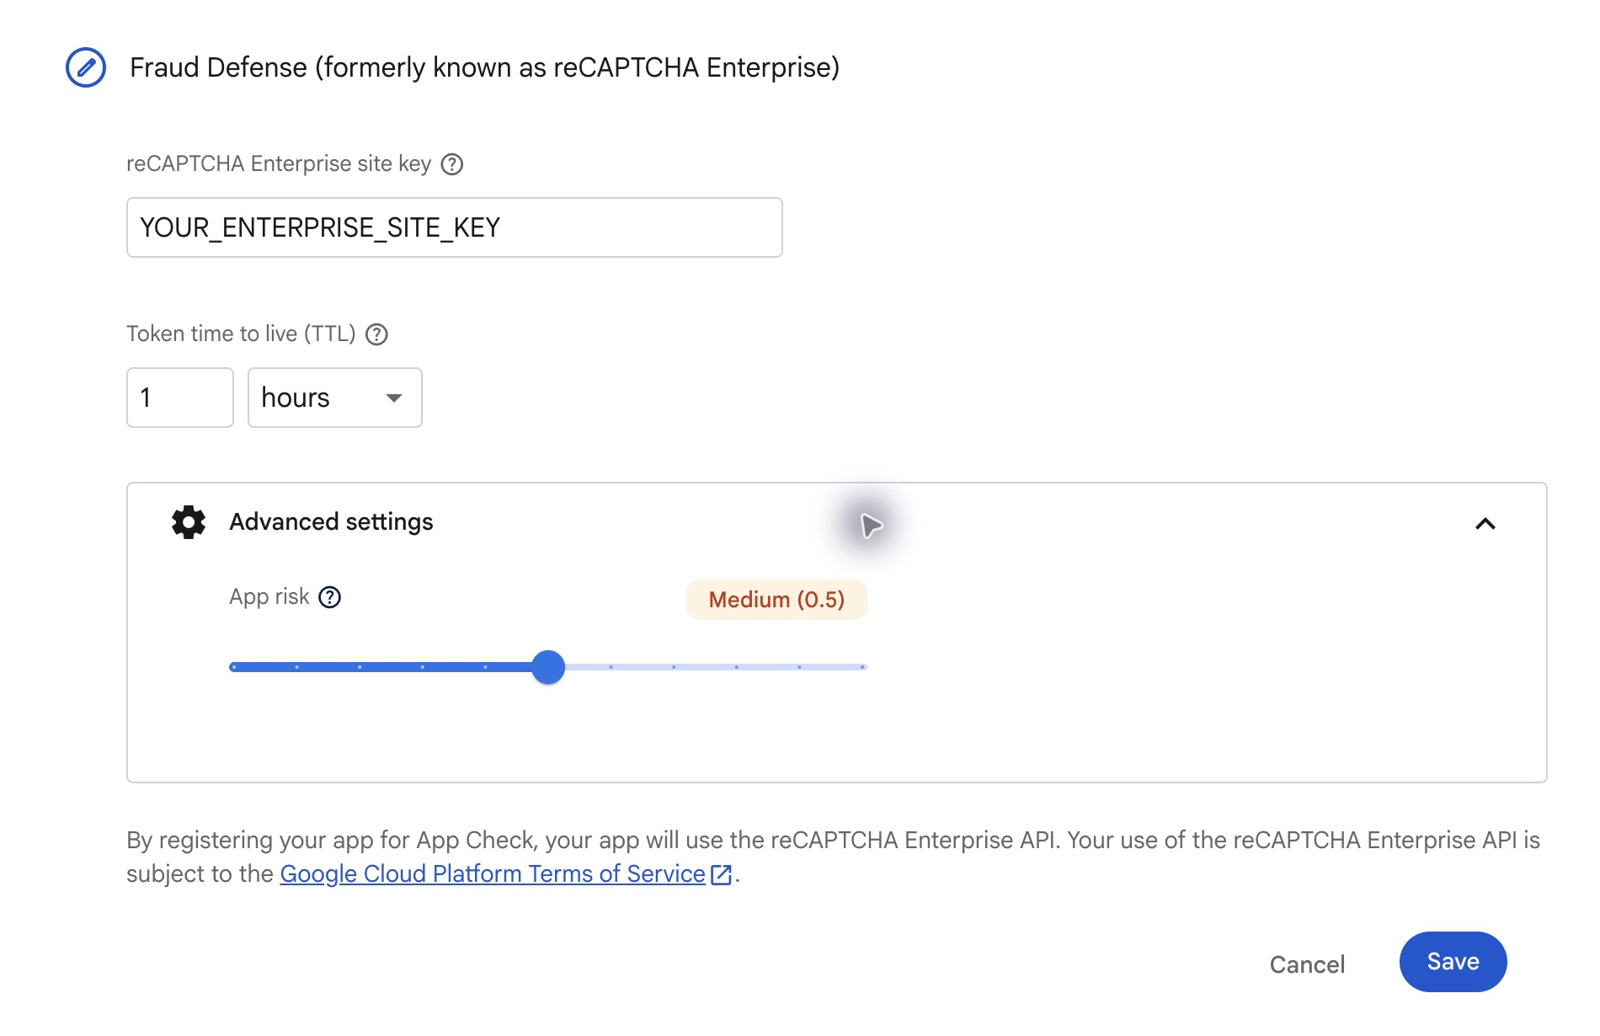
The site key shown above is a placeholder; paste the key you created in Google Cloud.
If you already have a Web app, reuse it. You do not need another app for Enterprise. Its nickname is only a display name: renaming it in Project settings → General → Your apps does not change the app ID or require a new VITE_FIREBASE_CONFIG value.
Configure and deploy reVISit
Set these values in your study repository's .env, keeping the VITE_FIREBASE_CONFIG value you copied earlier:
VITE_STORAGE_ENGINE="firebase"
VITE_RECAPTCHA_ENTERPRISE_SITE_KEY="your-enterprise-site-key"
A nonempty VITE_RECAPTCHA_ENTERPRISE_SITE_KEY selects Enterprise. When it is empty or unset, reVISit keeps the v3 provider and its existing VITE_RECAPTCHAV3TOKEN site key. reVISit enables automatic App Check token refresh for both providers; you do not need to add a refresh timer or load a reCAPTCHA script yourself.
The supplied Deploy To GitHub Pages workflow reads the Enterprise site key from .env. It does not require a GitHub repository variable for App Check. If you fork the study repository, replace its checked-in key with one configured for your own domain. For other hosting services, supply VITE_RECAPTCHA_ENTERPRISE_SITE_KEY in the build environment or .env.
These settings are read when the website is built. Restart yarn serve after changing local settings; for a hosted site, rebuild and redeploy using the deployment guide. Editing .env alone does not update an already-published site.
Verify the deployed setup
Open your deployed site in a fresh browser session. In the browser's developer tools, check that the App Check request named exchangeRecaptchaEnterpriseToken succeeds. Then use an example study to check that responses save and data uploads succeed. Check Firebase's App Check request metrics and verify that the token refreshes during an open session; with the default one-hour lifetime, refresh is expected at approximately 30 minutes.
A page loading or an upload succeeding does not by itself prove App Check is working: services in Monitoring mode still accept requests without valid App Check tokens. Monitor valid requests before enabling enforcement, and confirm that all deployed apps are registered. See Firebase's Enterprise App Check guide for setup and enforcement details.
Migrate an existing v3 deployment
Keep your existing v3 key and registration while adding Fraud Defense to the same Firebase Web app. Both providers can remain registered at the same time. New and existing sessions built with v3 can continue using v3 while a newer deployment uses Enterprise.
- Create and register the Enterprise key as described above, without removing v3 or changing enforcement settings.
- Set
VITE_RECAPTCHA_ENTERPRISE_SITE_KEYin.envon your development branch and deploy a preview ordevfirst. The existingmainbranch keeps using v3 until you release the change. Previews and development builds may share the production database, so use an example study rather than an active study collecting Participant data. - Verify token exchange, response saving, uploads, and refresh before merging the development branch into
main. The release carries the.envsetting into production, so new clients will then use Enterprise. - Preserve both registrations for older deployments and open browser sessions. To return new clients to v3, clear the Enterprise setting used by that build and rebuild/redeploy. Leave the legacy v3 key configured for this rollback, and keep Enterprise registered for sessions already using it.
Google's migration of Classic keys to Google Cloud is separate from switching the Firebase provider. It does not, by itself, require changing your reVISit client.
Local development with debug tokens
When you run yarn serve, reVISit enables Firebase App Check debug mode for local development. The debug provider lets you test locally without adding local domains to the production key.
-
Set
VITE_STORAGE_ENGINE="firebase"and your Firebase configuration in.env, then start or restartyarn serve. -
Open
http://localhost:8080, select a demo study, and open your browser's developer console. -
Copy the App Check debug token printed in the console.

-
In Firebase Console → App Check → Apps, open your Web app's menu, select Manage debug tokens, and register the token.


-
Reload the local site. If browser storage is cleared and a new debug token is generated, register the new token too.
Keep debug tokens private and out of source control. Debug mode does not verify real Enterprise attestation; test that separately on your deployed site. See Firebase's debug-provider guide.
Allowing for CORS requests
Once that is finished, we'll have to use Google's gsutil function in the terminal to set up a CORS policy so that the application can communicate with Firebase storage. Follow these steps on how to install gsutil on your local machine.
After installing gsutil, you need to navigate to the google-cloud-sdk/bin folder on your local machine. Create a new file called "cors.json" with the following contents:
[
  {
    "origin": ["*"],
    "method": ["GET"],
    "maxAgeSeconds": 3600
  }
]
Lastly, while still inside this same directory, call the following function:
gsutil cors set cors.json gs://<your-cloud-storage-bucket>
You can find the link for the storage bucket by navigating to the "Storage" product in Firebase.

Assuming that you have already changed the VITE_STORAGE_ENGINE variable in the .env file to "firebase", you can now call yarn serve to launch the server and navigate to http://localhost:8080 to launch any demo study. All data from any participant session will automatically be uploaded to Firebase.
The build must also use VITE_STORAGE_ENGINE="firebase". A deployment workflow can override your local .env settings, so check its build environment before publishing.

Deployment
If you are intending to deploy your reVISit application to a static website, we suggest following our guide to deploy to GitHub Pages. In this, you'll see that there is an additional step that you will need to follow in Firebase so that your custom domain can authorize users.